
9 ways to mount a café racer motorcycle custom fender
Building custom motorcycles is a harsh mistress, a big part of that is mounting your custom fender up. Go too crazy with your ideas and your clients will be left scratching their heads wondering what the hell you’ve done. Stay too close to the trend and you run the risk of fading into oblivion in a sea of bolt-on parts, and motorcycles that excite you no more than you’re Grandpa’s Christmas cardigan.
When it comes to the front motorcycle fender, I love to get creative with the mounts. If you’re building a stripped-back café racer or scrambler, each piece becomes pivotal. You only have a frame, engine, wheels, tank, seat and custom fenders so every bit counts.
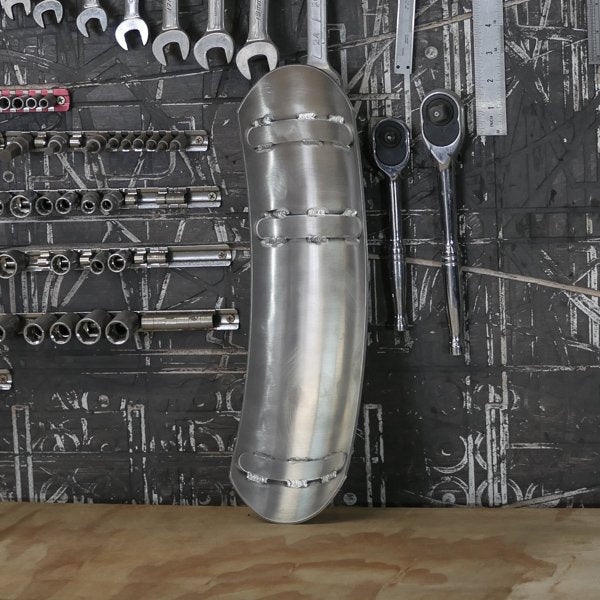
This article will run you through some of our past mount types and give you a look at how we go about making the most of the custom fender. We use a universal fender blank, 3mm aluminium that will fit most common tyre sizes from 17” 18” and 19” rims. Fitting up to a 120 wide front tyre these fenders are a great rounded profile, and include bracing straps welded underneath for strength and to be used to drill and tap out to save having nuts on the underside of your fender.
Another commonly used component is our Universal DIY fender mounting Kit. I’ll mention it where applicable below, but this kit is a must have for the garage builder with a bit of fabrication skill but not every tool under the sun. Comprising of all of our commonly used stainless steel materials used to create and finish some amazing fender mounts.
General front motorcycle fender mounting technique
Mounting a front custom fender on your motorcycle can be done in numerous ways. But running a custom garage as efficiently as I can without quashing creativity, I’ve worked out what’s best for me and I’ll share that with you. No matter how the fender mounts are done this process is used to have the bolts fitted that fix the aluminium front fender.
Taking the fender blank, in the past, I’ve welded on my own bracing and thread thickness to the underside. On our universal fenders, this is already prefabricated for you. Get your mounting idea together and figure out if you want 2, 3 or 4 mounting points. Mark where they will be and drill and tap those points. The Purpose Built Moto front fenders give you 6mm of material thickness to thread into. I will use an M6 thread tap and screw to mount most fenders, but if I want an extra minimal look M5 threads can be used as well. Just design to suit.
Another advantage of these aluminium fenders and the way we mount them is tyre clearance, and ease of removal and installation. After placing the threaded mounts there’s no need for tools and nuts under the fender allowing you to fit these fenders beautifully close to the tyre which makes your finish look that much better. Allowing for some tyre expansion and the vibration is always crucial but that can be as little as 6mm depending on your application.
Click here to get your Purpose Built Moto Universal front fender
Threading the custom fender also allows for quick removal and installation. With a single allen key, no more sliding a tool with a nut between the fender and tyre. I hated wasting time doing this which was the catalyst to see this fender design and process through.
Now let’s get into making them look good with your choice of mounts.
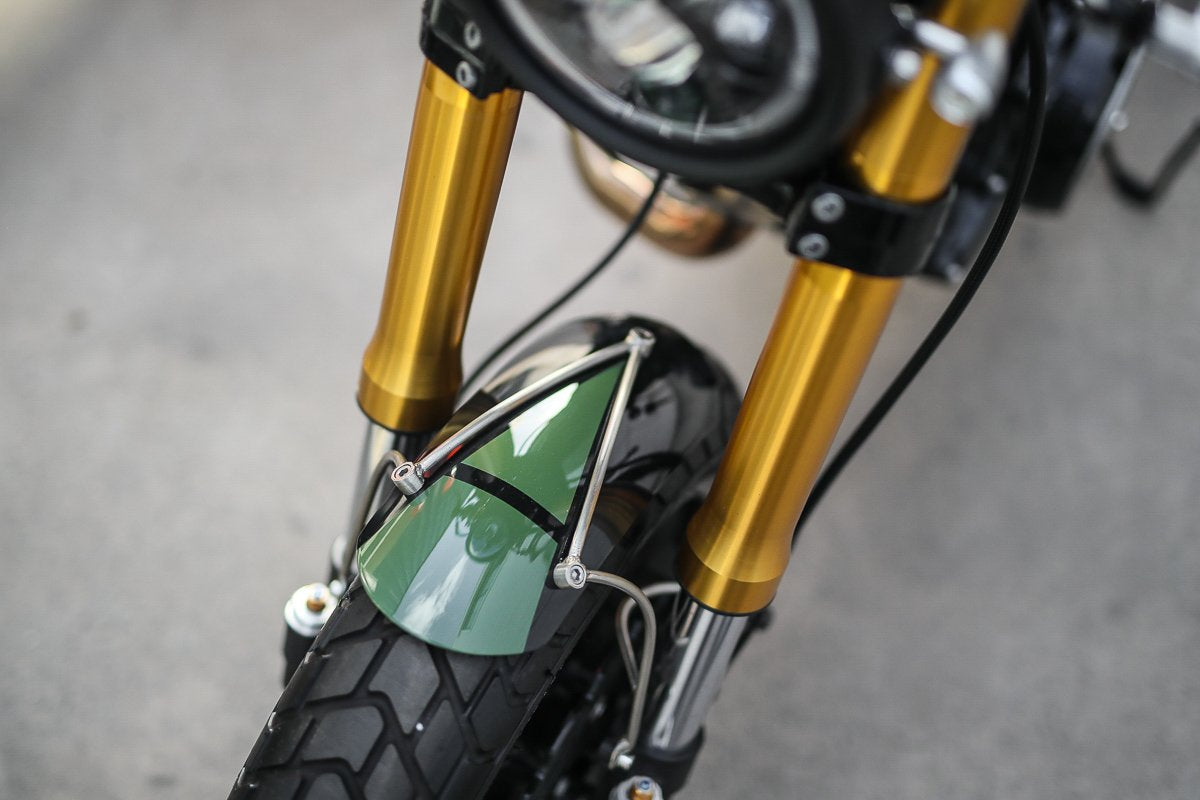
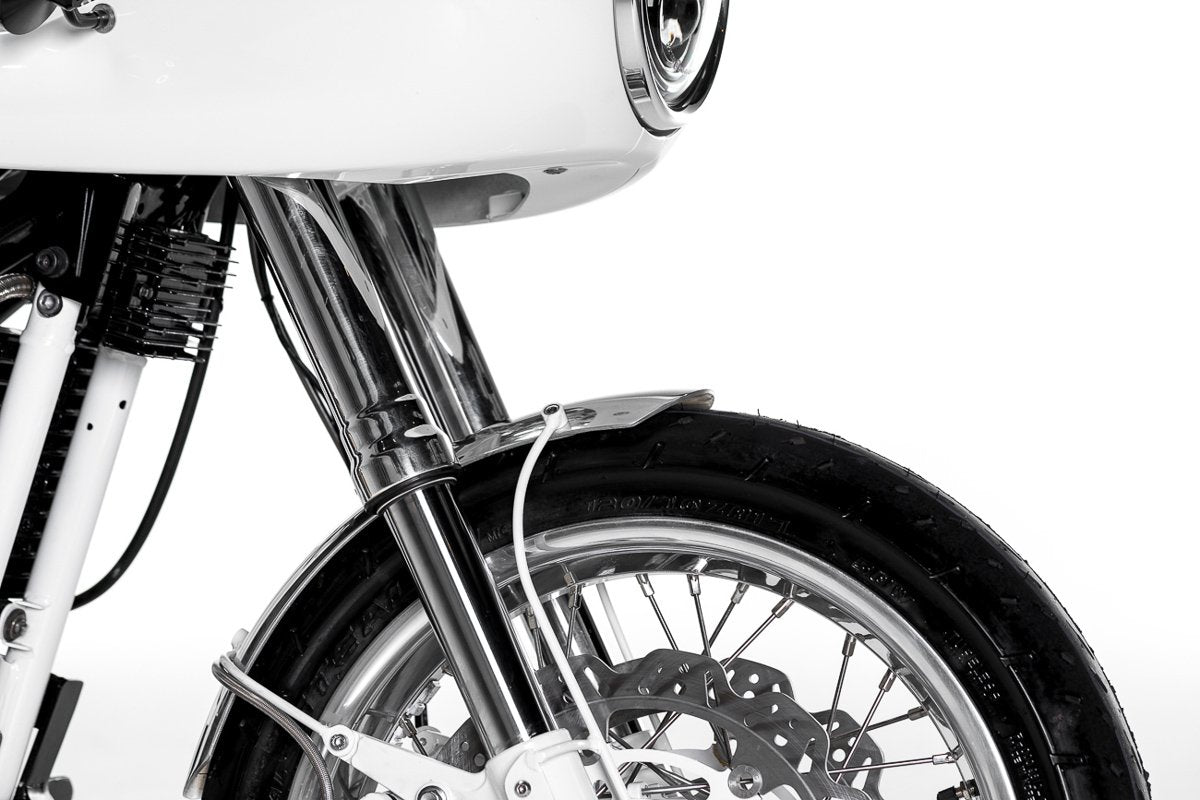
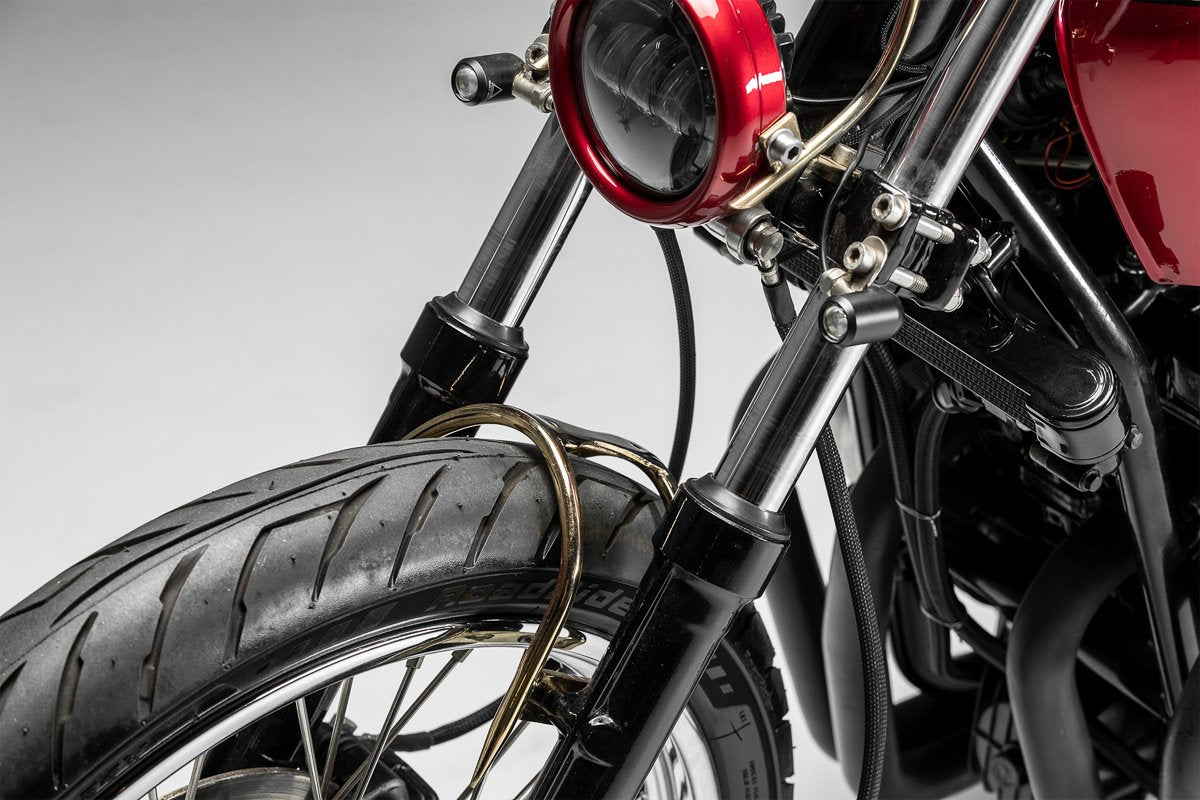
1. Countersunk bungs + Stainless rod 3 point mount
This mount type I have used a few times on projects with a bit more of a sharp edge. 3 point mounting gives a pretty sleek and untraditional look to the front fender so to me it doesn’t work too well on more classic bikes.
Seen here on our XV750 café racer using the custom fender mounts to guide the paint design.
here we use a 6mm round bar, hand-shaped and linked to an M6 fabrication bung countersunk to allow the screw to sit flush. All of the materials needed for these fender mounts are in our DIY Fender Fabrication Pack.
This type works better for USD forks as the standard fender mounts provide a lower fixing point to traditional forks. Although can be applied to both. Starting with the fender spaced from the tyre and fixed in position, I’ll put the bolts and fabrication bungs on the fender. And also bolt on the bungs or mounting plate to the fork.

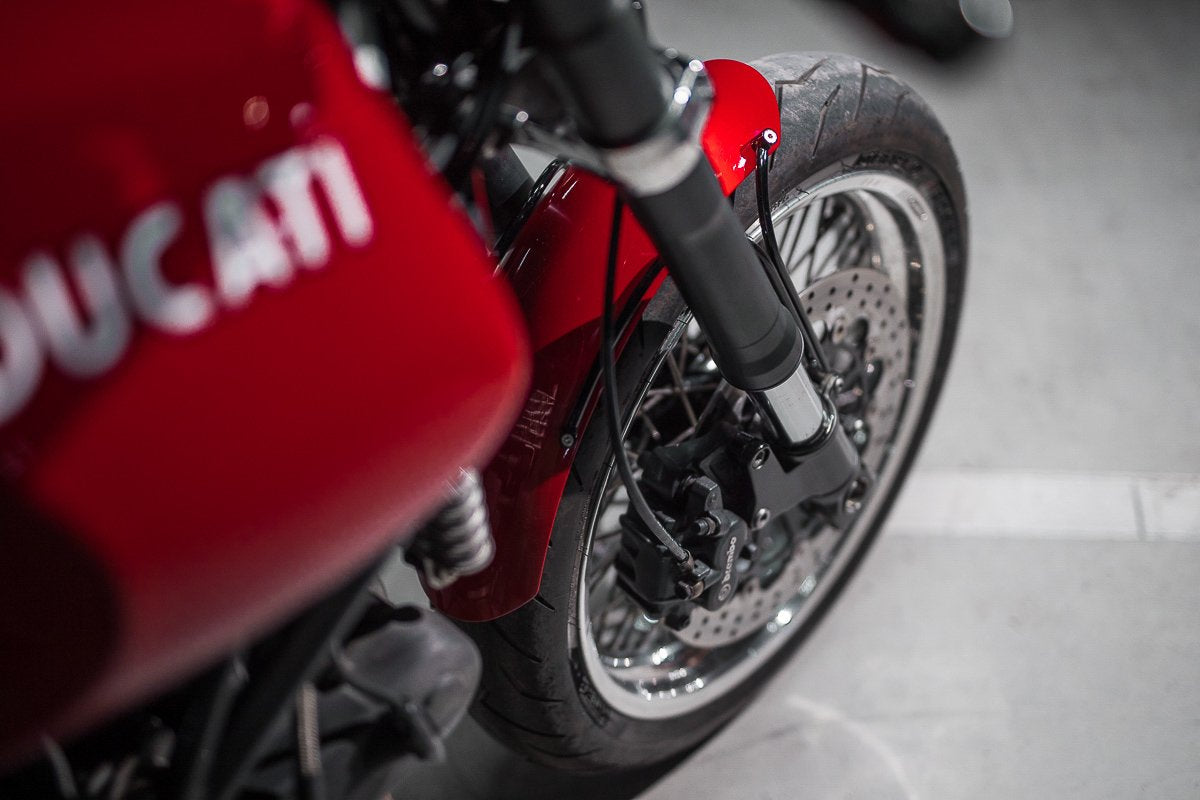
2. Countersunk bungs + Stainless rod 4 point custom fender mount
Much like the above method, but with an extra mounting point. The 3 point is a very minimal approach but can be hard to make work as most often you’ll end up with a triangular shape. Triangles don’t suit a lot of bikes so these one is for them.
It’s easier to create a classic style with 4 mount points as you don’t really have to link left and right together at a centre point. using the same technique described above I’ll lay it out, mock it up and get bending.
Any of these fabrication bungs can be purchased from the PBM store, M5 M6 and M8 types, or if you have a lathe you can take the time and DIY. Up to you! Click here for info on our fabrication bungs or just grab the full fender mounting kit.
It’s worth mentioning here that on the fork you need to link 2 mounting points together on each side to create rigidity and not have the mount’s pivot on a single point. Having that happen could be disastrous. So make sure the mounts can pivot and move during your design stage. Different bikes have different mount points so use your imagination and anything can be made to look like it belongs there. The fender mount shown here is a Ducati GT1000 we gave a facelift. Doing away with the plastic fender and mount to make way for a custom aluminium café racer fender and hand-built mounts. Finished in black and red to keep em classy!
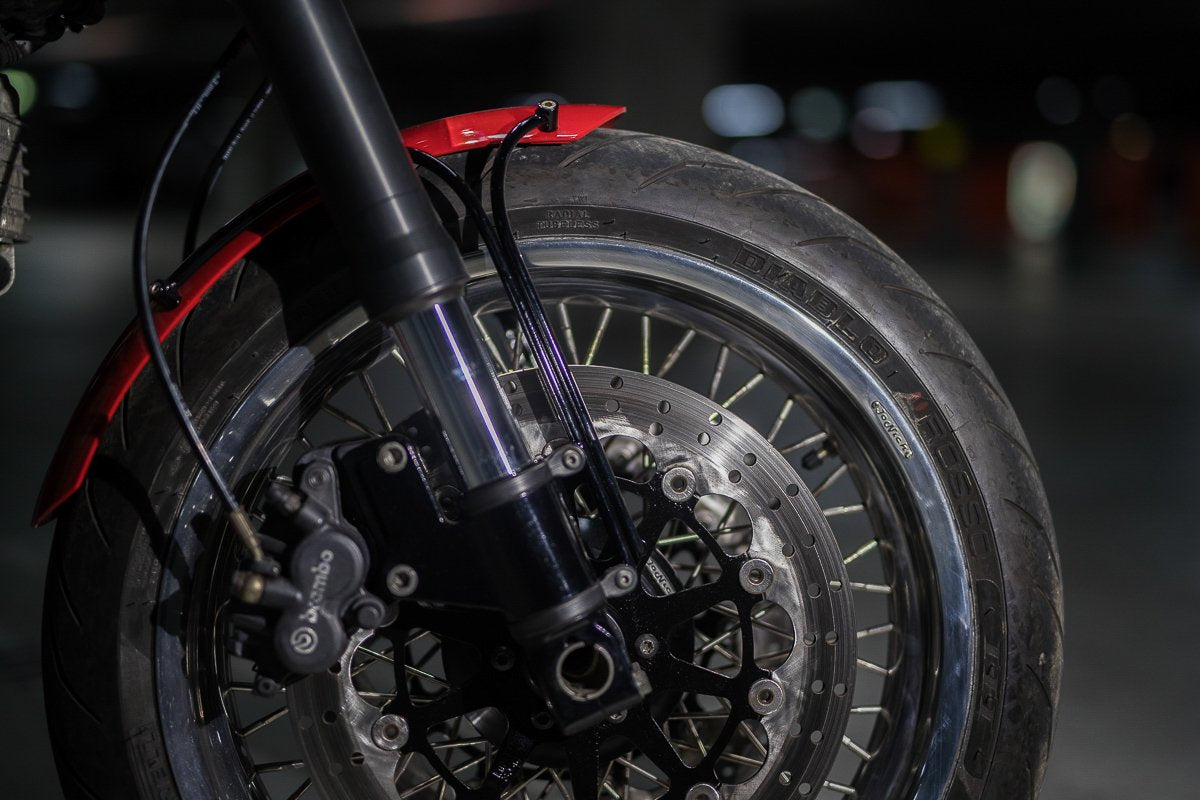
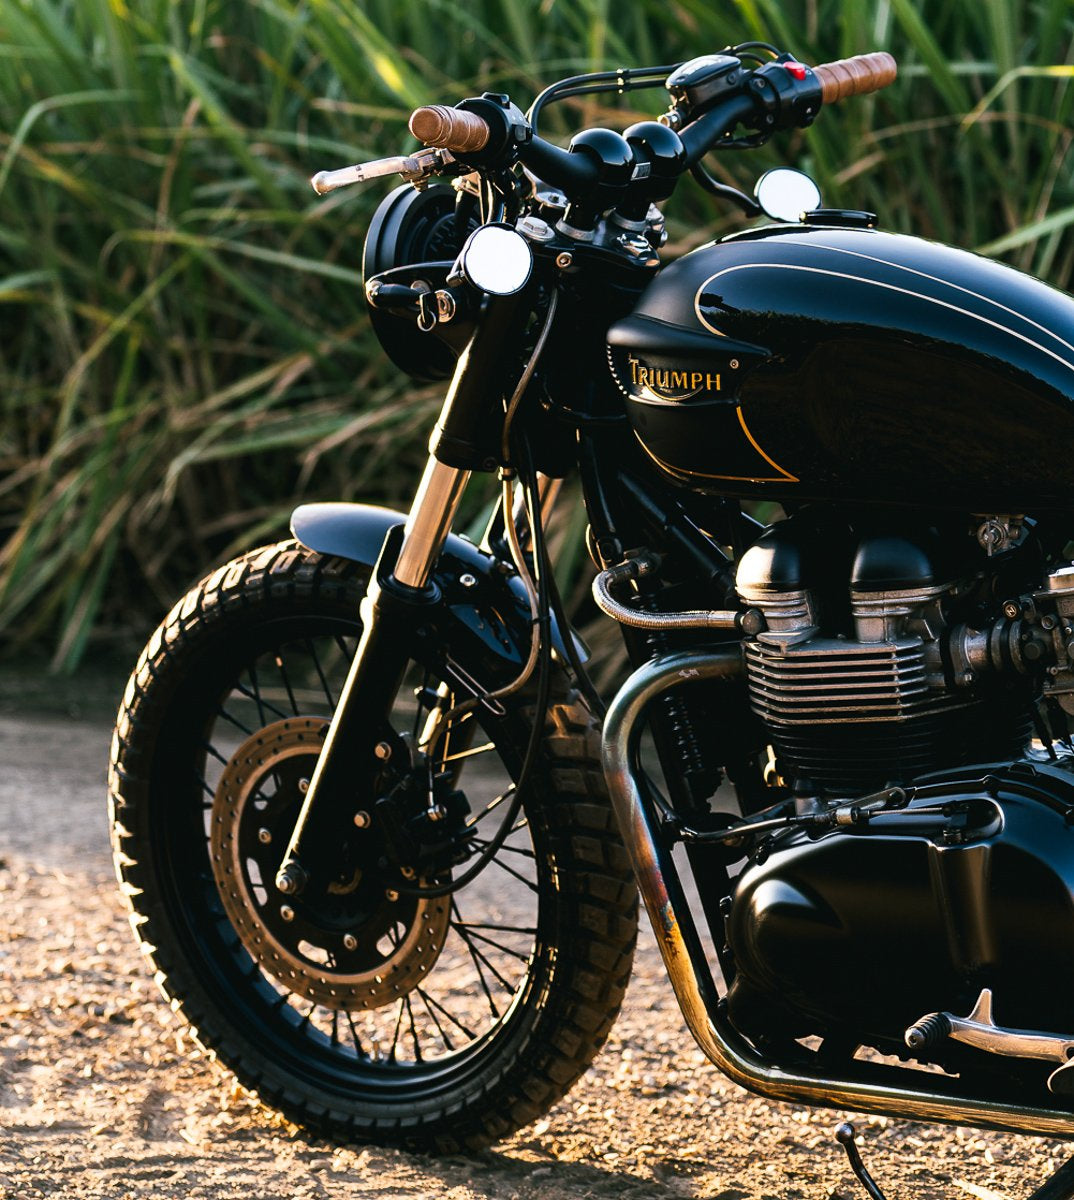
3. Countersunk bungs + Stainless rod 2 section fender mount
This is probably the most classically styled of the fabrication bung/stainless rod mounts for your custom fender. Using again our Universal Fender Fabrication Pack.
Using the USD fender mounts on the front of the forks for a forward mount, and creating a rear mount that links up the brake calliper mounts on the rear of the fork. It throws back to a vintage style that Triumph used a lot and has revived in their later model Bonneville fenders.
Shown here on our Triumph sidecar café racer I was able to emulate the classic style with 3 mount points on a set of USD forks pulled off a triumph tiger adventure bike.
4. Modifying your stock fender.
We’ve covered this one before in detail in a separate blog but its worth a mention here. Trimming your motorcycle fender is a quick and easy way to get a good look with minimal effort. A really good option to use if the stock fender is pretty nice, but just a little too long. Shown here on our first ever triumph scrambler project.
That’s not what bike building is about though is it? Bike building is about putting your effort into creating something uniquely yours. So I always prefer the fabrication route. But I have definitely used this motorcycle front fender method a few times when budget dictated I needed a quick solution.
If you want more info on this, check out this article.
5. Steel strap fender mount method
This technique for mounting fenders is a good one if you have conventional forks and want a very minimal and almost completely hidden fender mount. I first used this idea I had on the signature series CX500. I had made a carbon fibre front fender and wanted nothing else on the wheel because it looked as if it was floating.
The CX500 front end also needed a fork brace so I used some pretty heavy material. I measured between the factory fender mounts, it was about 38mm so I used some 50mm x 6mm mild steel flat bar. Cut it to length and bend it around a die (read a piece of pipe I had laying around) to give it a half hoop shape to go over the tyre.

From there I spaced the fender mount off the tyre and marked my mounting holes for the factory fender mount points. Drilled them out and mounted it up over the front wheel.
Last step here was to drill and tap 3 mount points on the mounting strap and get the motorcycle fender drilled to suit.
If a fork brace isn’t required, thinner material would be much easier to shape and use, 4mm thick flat bar for example.
6. Custom motorcycle fender high mount.
I’ve used this motorcycle fender method on a few scramblers I’ve built but never with an aluminium fender. Only with plastic MX fenders. Like the one shown here on the XT250 MX Scrambler.
That’s due to these scramblers being a little more late-model MX driven but the same thing can be applied to a classic aluminium front fender style.
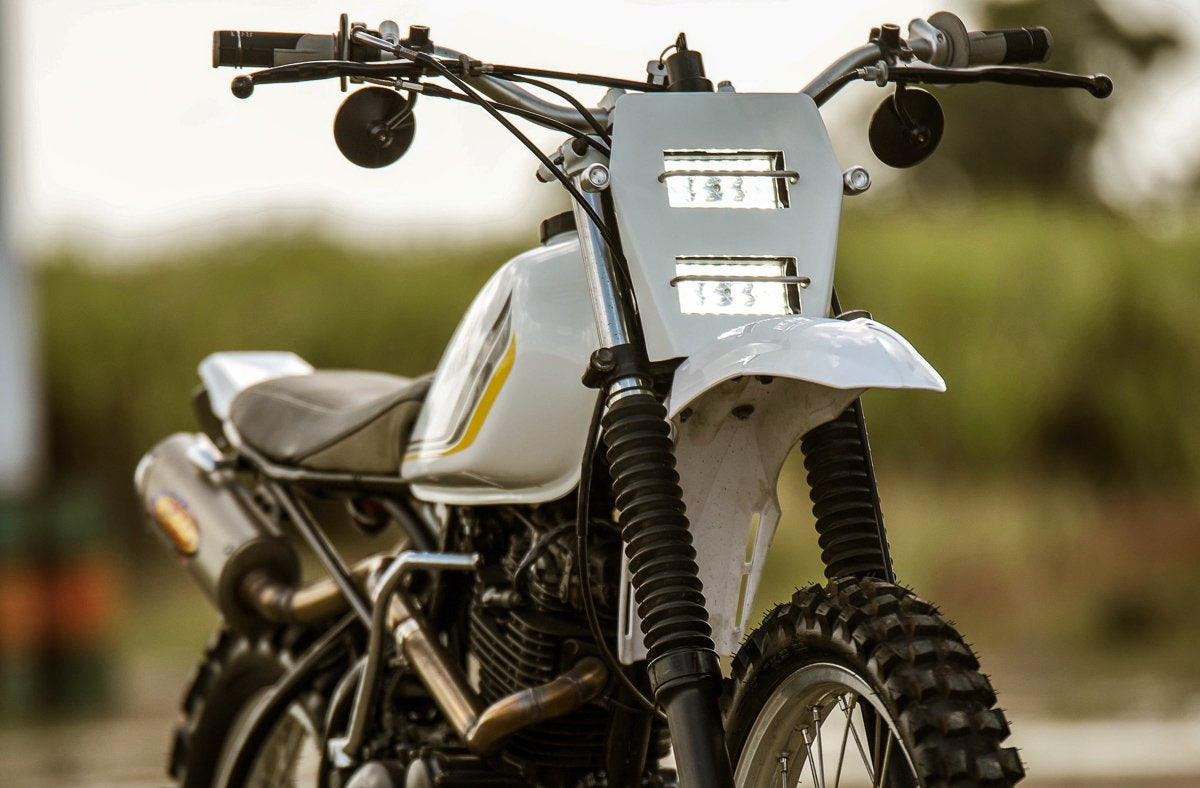
Some lower triple clamps have threads already in the bottom however if your bike doesn’t, you can always weld on or drill and tap them in carefully.
Using the bottom triple clamp threads all you need to do is drill matching holes in the fender.
On the plastic fenders, I’ve used some rubber spacers to mount the fender level and how it needs to be on an aluminium front fender though I would definitely turn and weld the spacers on. Nothing worse than trying to fit a fender and juggling the fender, a pair of bolts, and trying to keep a spacer in place with only 2 hands!
7. Folded flat bar fender mount
This is a technique that I’ve seen and really like when done properly but never actually used. To me, I like my fabrication to be a little more 3 dimensional but I do often see it on bikes and think I should give it a try!
Using some flat sheet or flat bar, I would make a paper template first marking where I need the folds need to be, cut out the shape in steel and use my finger brake or clamp the workpiece to a bench and fold it up.
Some guys that use this method really well are Debolex Engineering. I love their race-driven aesthetic and their motorcycle fender mounts are often of this type. Simple, practical and most importantly beautiful! really enjoy watching these UK builders produce outstanding bikes. Go check em out!

8. Integrated sheet metal front fender mount
Following on with the race-bred theme here’s a method I’ve just recently started to use. First tested on an 80’s inspired racer I built from a Honda VFR750. With the fairing endure bike style something sleeker and race-ready was needed. After a little bit of staring and thinking time I started to process of welding mounts directly onto the fender, but instead of using a round bar or fabrication bungs I simply cut out some aluminium sheet metal. With the fender-mounted in situ where it needed to fit, I took to shaping the sheet metal to continue the curve over the tyre and welded it onto the sides of the fender and blended it in.

9. Fork brace mounted.
The last one on this list of ways to mount your front fender is another I’ve covered in great detail before in a build your own fork brace blog. A lot of older model forks benefit greatly from some extra bracing and stabilisation on the front end, giving the rider better feedback and control.
In the article, I dive into the method and also mention how to incorporate some front fender mounting points too.
If you want to get into that style jump over to the fork brace article. Shown here on our Honda CB900 Chopper project, although not running a front fender, it does have the provisional mounts if the rider ever wanted to fit one.
That will wrap it up on my list of fender mounting types. If you have any techniques I’ve missed that you love, make sure you drop me a comment, I’m always looking to learn something new. I hope you’ve been able to draw a little inspiration that might spark your ideas. And make sure you check out the Universal Fender Fabrication Pack, it has everything you will need for any design fender.
Get out to the garage and get to work!
WE BUILD BIKES WITH PURPOSE.
Purpose Built Moto is home for unique custom motorcycle builds. We offer a unique motorcycle customizing experience in the heart of the Gold Coast.


4 comments
Hi Tom,
I’m looking to put a rear fender on a 1982 XV750 Virago. I actually have the universal fender kit as well as the fender blank but am looking for something longer. The battery box will be in place of the center stand underneath the engine so I would like to protect that from tire spray and still be long enough to come over the top of the tire? Can you make a longer fender blank?
Thanks,
Joe
Hey,
I am fan of you blog, it helps me to improve my study. Thanks for presenting such nice and great informative article named “9 ways to mount your motorcycle fender”.
Cheers
Hi Daniel,
We have finished prototyping them and will have them for sale by the end of this month all going well!
Hi Tom,
Great write up on custom fenders. I am in need of one for a USD front end and am wanting to do it similar to the ones you have here with the aluminium blank with the extra welded in plates so it can be threaded. Do you have these for sale?
Cheers mate.